
WireGuard Manual for Beginners
![]()
WireGuard for Beginners
Last edited on May 1, 2023. Created by @Sergio151179
![]()
---Requirements---
Requirements to follow this manual:
- Have a Xiaomi or Redmi AX series router with an ARM64 architecture processor and without the new protection. (Xiaomi AX9000, AX3600, AX1800, Redmi AX6, …)
- Have SSH access.
- You will need the tools Putty and WinSCP.
- We will need to download these files:
- wireguard-go
- miwifi_overlay
- wg-quick
- wireguard
![]()
Part 1
-
Part 1, enabling read/write to install programs:
- Create a connection in WinSCP to access the router.
- Pay special attention to choosing SCP Protocol, the router's IP address 192.168.31.1, and the root user.
- Click "Connect," and a window like this will appear.
- Enter the SSH password, and you will access the main window.
- On the left side, you have the folder on your computer, and on the right, you have the folders and files on the router. - Next, on the left side, locate the files you have downloaded on your PC for this tutorial, and on the right side, navigate to the location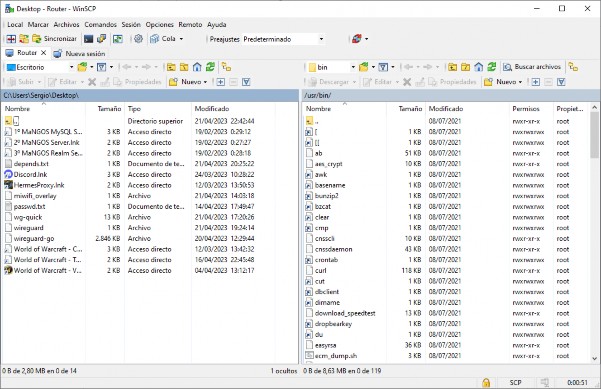
/etc/init.d.
- Select the file miwifi_overlay on the left and click the right button to upload it. - Then, select it on the right and click the right button, then choose "Properties."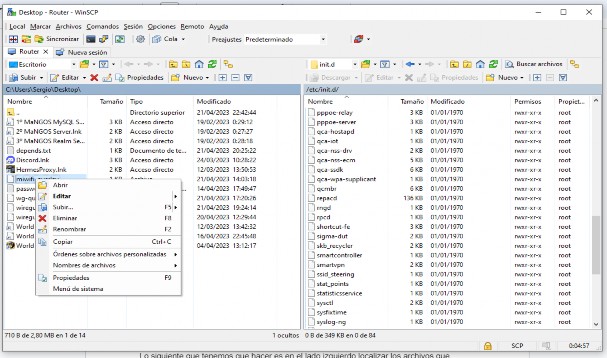
- Set the permissions to 0755 and close the WinSCP session. - Open an SSH session with Putty.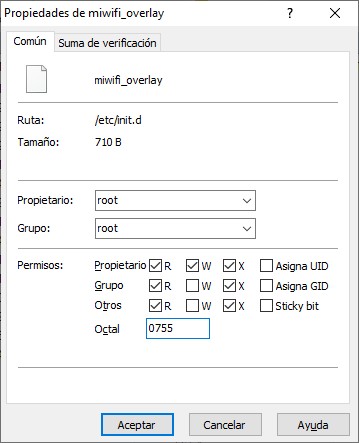
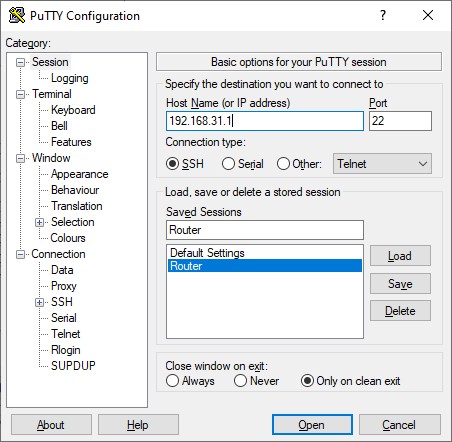
- In the SSH session, enter the following commands:
service miwifi_overlay enable
sync
reboot
- After entering the commands, the router will restart, and read/write access will be enabled, allowing you to proceed with the installation.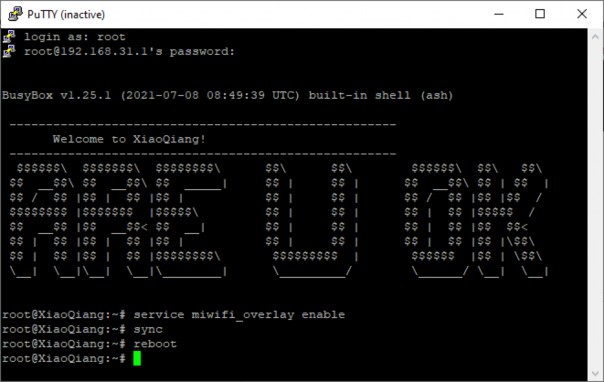
![]()
Part 2 (WireGuard Server Installation)
-
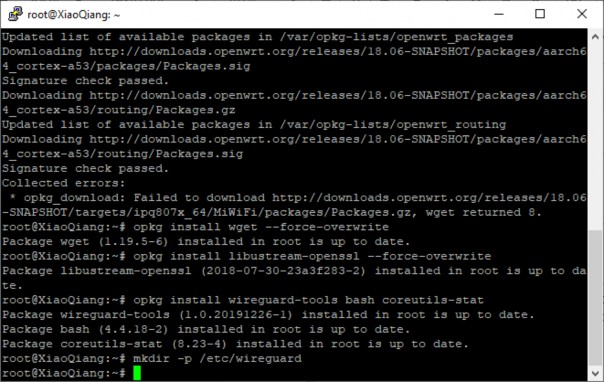
Next, open an SSH session again:
- Enter the following commands:
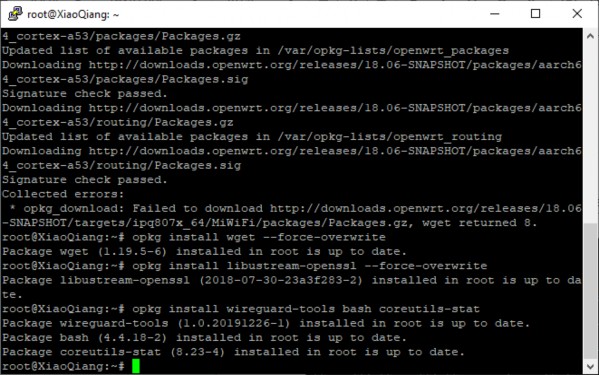
cat << EOF > /etc/opkg/distfeeds.conf
src/gz openwrt_core
http://downloads.openwrt.org/releases/18.06-SNAPSHOT/targets/ipq807x_64/MiWiFi/packages
src/gz openwrt_base http://downloads.openwrt.org/releases/packages-18.06/aarch64_cortex-a53/base
src/gz openwrt_packages http://downloads.openwrt.org/releases/packages-18.06/aarch64_cortex-a53/packages
src/gz openwrt_routing http://downloads.openwrt.org/releases/packages-18.06/aarch64_cortex-a53/routing
EOF
opkg update
opkg install wget--force-overwrite
opkg install libustream-openssl--force-overwrite
opkg install wireguard-tools bash coreutils-stat
mkdir -p /etc/wireguard
- Open a WinSCP session without closing the SSH session:
- In the left window, select the folder where you have downloaded the files for the tutorial, and on the right, navigate to
/etc/init.d.
- Select "wireguard" on the left screen and click "Upload." On the right screen, open the properties and set the permissions to 0755.
- Next, change the folder on the right to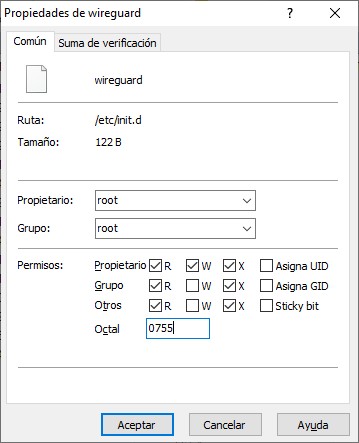
/usr/bin.
- On the left screen, select and upload "wg-quick" and "wireguard-go." Then, on the right screen, select them and change the properties to 0755 for both files.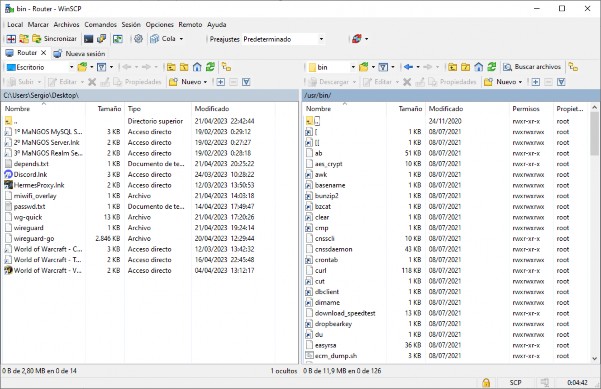
- Return to the SSH session and open the port on the router for the WireGuard server.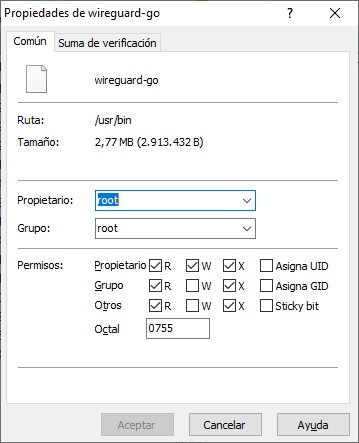
uci set firewall.@rule[-1].name='Allow-WireGuard'
uci set firewall.@rule[-1].src='wan'
uci set firewall.@rule[-1].proto='udp'
uci set firewall.@rule[-1].dest_port='51820'
uci set firewall.@rule[-1].target='ACCEPT'
uci commit firewall
service firewall restart
- Add the WireGuard network.uci set network.wg0='interface' uci set network.wg0.proto='none' uci set network.wg0.ifname='wg0' uci commit network /etc/init.d/network reload
- Add a new zone in the firewall and forwards.uci add firewall zone uci set firewall.@zone[-1].name='vpn' uci set firewall.@zone[-1].network='wg0' uci set firewall.@zone[-1].input='ACCEPT' uci set firewall.@zone[-1].output='ACCEPT' uci set firewall.@zone[-1].forward='REJECT' uci commit firewall uci add firewall forwarding uci set firewall.@forwarding[-1].src='vpn' uci set firewall.@forwarding[-1].dest='lan' uci commit firewall uci add firewall forwarding uci set firewall.@forwarding[-1].src='vpn' uci set firewall.@forwarding[-1].dest='wan' uci commit firewall uci add firewall forwarding uci set firewall.@forwarding[-1].src='lan' uci set firewall.@forwarding[-1].dest='vpn' uci commit firewall service firewall restart
- Next, open the browser and go to the page https://www.wireguardconfig.com/.
- Select the number of clients that will connect. In my case, I will only put one. In the CIDR field, I recommend putting 10.8.0.0/24. Endpoint is the most important field, telling clients where to connect. If you have DDNS configured, put the domain; if not, use the public IP with this format
mirouter.ddns.org:51820or200.120.12.2:51820. It's important to include:51820after your IP or domain, which is the port we opened on the router for communication.
- Leave the "Post-Up rule" and "Post-Down rule" lines blank.
- Click "Generate Config," then scroll down to "server" and copy the text from the box to the clipboard.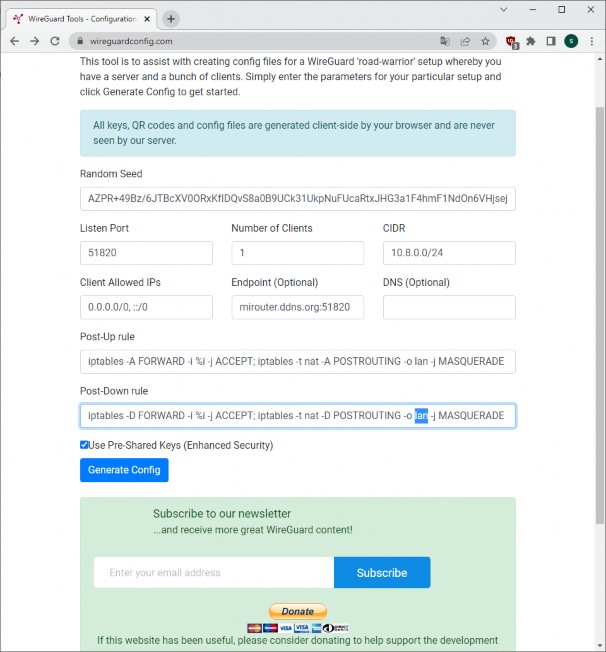
- Go to WinSCP, in the right window, navigate to
/etc/wireguard, and click the "New" button on the right. Choose "File" and name it wg0.conf, then paste the text from the clipboard.
- Save and close it. Select the file in the right window and set the permissions to 0600.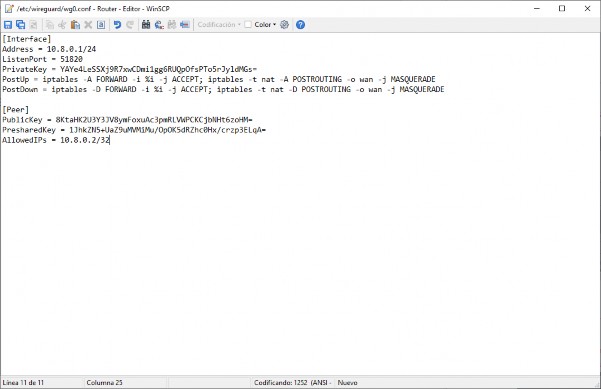
- Next, we'll activate the server. Return to the SSH session.
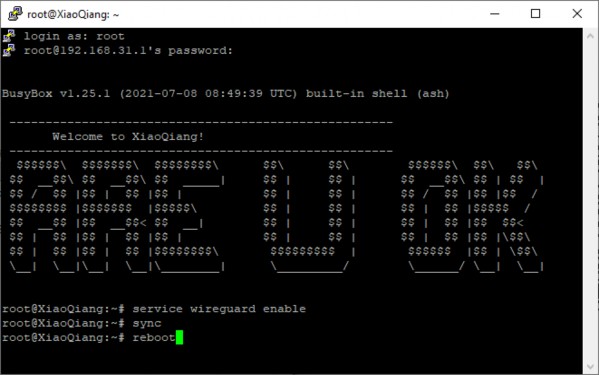
service wireguard enable
sync
reboot
- When the router finishes restarting we will have the server active. - To connect clients we only have to scan the corresponding QR code from the phone app or if it is a PC, the client copies the text from the corresponding box.
![]()
WireGuard Recovery
-
After a system update, just as you have to wake up ssh, you also have to recover wireguard, but it is very simple.
- We open WinSCP and open a connection with the router (first you have to wake up the ssh).
On the PC side we navigate to the folder with the manual files, and on the router side we navigate to/etc/init.dand we go up to the wireguard router.
- We give you permissions 0755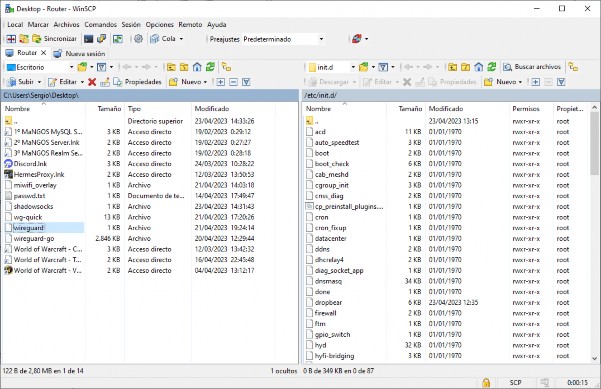
- We log out of winscp, then we open ssh and enter the following commands:
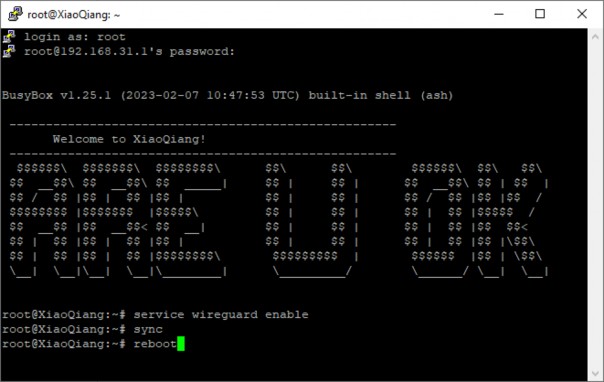
service wireguard enable
sync
reboot
![]()
![]()
 Asistente XiaoHack
Xiaohack V 3.3 | © Copyright 2024 | Users Online: 0 | Estado: Offline